
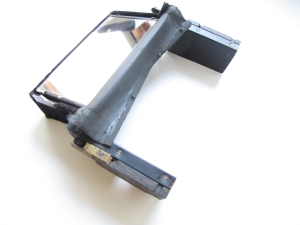
The Graflex 1 A
Reflex Roll Film
Camera
1915
Beautiful designed in geometric forms and symmetry, reflects the focus on
modernism and technological advancement from the beginning of the 20th century.
Especially the externally hinged supporting construction to keep the long
viewing hood upright, is an eye caching detail.
#47368
Photo © Jo Lommen
Let's see what we have here.
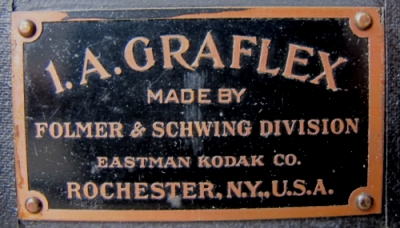
Graflex 1 A Reflex Roll-film Camera made by
Folmer & Swing Division.
The camera was made by the Folmer & Swing founded in 1888 and
purchased by Kodak in 1905
and consolidated as The Folmer & Swing Division established in
Rochester.
This
Graflex 1 A, introduced in 1909 took the regular 1 A Kodak film and
made 2 ½ x 4 ¼ negatives.
The 5 slit horizontal running (vertical slit! ) focal plane
shutter exposed from 1/2 second to 1/1000 of a second.
The image on the
ground glass corresponds in principle with the film size albeit a
slight bit narrower than the negative format, probably to keep the
camera as compact as possible.
The image on the ground glass is
projected right side up.
To prevent unwanted double images on the ground glass, the mirror of a reflex
camera has the reflecting silver coating on top of the glass
as opposed to a conventional mirror
where the reflective layer is applied behind the glass. *
Cleaning has to be done
very carefully to avoid rubbing off the fragile coating.
Winding
of the curtain when the mirror is up would cause a fogged film, reason
why the 1 A Graflex is fitted with a safety device which prevents that.
First set the mirror and then wind the curtain in the wanted position.
The amazing large focusing hood is held in position by a spring
actuated scissor construction, which folds compactly back in the top of
the camera.
On top of the hood, the eye shield prevents incoming light
and thus allowing a good sight on the ground glass.
On the front side
of the eye shield we see the companies tag while the exposing tag is
situated on the inner side.
The
drop bed is milled from heavy brass, a stop on the focusing rail
indicates the 'universal focus" of the lens.
This permits the use of
the camera for general fixed focus work, as well as photography in
which focusing must be done with the utmost accuracy.
When the camera
is closed the lens, mirror and bellows all recede into the body of the
camera, making it possible to reduce the size to an extent never before
attempted in a reflecting camera.
For
that time it was a real improvement of easy loading the film spools.
A
self-centring device makes it possible to simply drop the film spool
into position, where it finds its own centre.
It must be said that the original film is no longer available but new 3D printed
adapters* make it possible using 120 film for this amazing camera.
The film winding key when
drawn out and given a slight turn will locks the loading device open ready to
receive the film.
Another turn allows it to snap back into position and lock the film safely to
wind it to the first exposure.
The film pockets are provided with tension
springs which prevent the roll film from unwinding.
In the begin of the
20th century the 1A Graflex
construction
details made it to an ideal travel camera for the motorist, tourist, or anyone
desiring a thoroughly efficient reflex camera.
The camera measures 5½ x 9½x 3 inch. Focal capacity 6½ inch. Weight 4
pounds. Lensboard 2¼x2 3/8.
*)
The Graflex 1 A normally takes, at that time regular
2
½ x 4 ¼. inch
1 A Kodak film.
However with the help of 4 pieces of 116 to 120 film spool 3D printed adapters
-available on the internet- you'll be able to take photos using a currently 120 film spool.
For more
details see my own version of
The
Graflex 1 A Operating directions

© photo Jo Lommen
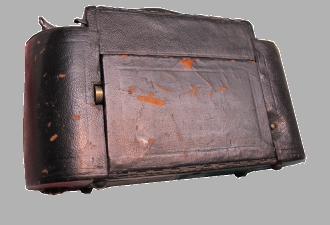
Early Model Graflex 1 A-
Very Clean-Working shutter.
This was the literally text on eBay which made me buy
that camera. I was looking some time to get this impressing camera with
its characteristic and unique
scissor
construction which holds the long tall viewing -chimney- hood strait
up.
The camera is fitted with a 3 ¼ x 5 ½ lens However there was
something wrong with it. Probably the rear cell was not original. The
lens' infinity focus needs about 18 cm which is far too long for this
type of camera which bellows stretches maximum 13 cm. This particular
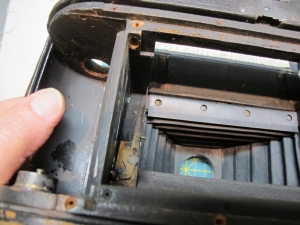
camera was far from clean. Inside the camera it was a totally mess. The
mirror didn't snap into its position and the shutter didn't fire.
The shutter curtain was only moving a couple of inches when trying to
turn the winding key. The view on the ground glass was impossible not
only because of the not working collapsible viewing hood but mainly
because of a not correct in line set mirror. The bellows and its back
frame were out of order mainly caused by its incorrect position in the
camera house. The mirror did not pop up. In fact things did not move at
all inside the mirror house. As a result of this, the focal plane
shutter winding mechanism was blocked. As said before, the focal plane
shutter moved a few inches and was drawn back again in its home
position. As expected the release lever was stuck.
I concluded that I had been tricked and soon realised that this was not
just an incorrect fault description. However I decided to resign and
concentrate on repairing this unique camera
Repairing / Overhauling

Removed scissor focusing hood and taken out ground glass,
release mechanism, mirror setting lever and winding mechanism.
Hinged mirror mechanism, back cover and bellows.
First of all I had to remove the scissor construction as well as the
ground glass, which allowed me a good view inside the mirror house.
Pulling the lens board out of the camera housing in this situation
seemed to be delicate and not without risk. I decided to tackle the
problem from the back side and leave the bellows with the lens board on
the yoke outside the camera house. The back cover can be taken off very
easy by squeezing both slots. The film exposure frame is now visible
and can be taken off by unscrewing 8 screws. Both ends are to be lifted
out of the roll film covers. As expected the curtain was in closed
position and should be taken out to be able to work on the release
mechanism and the mirror problem. The left and right control covers of
the camera top can be unscrewed and taken off without a problem. You
may hear and feel how the spool spring releases when you take off the
cover by tilting the tension winding key. On the opposite site you will
practically not feel any resistance. All the shutter mechanisms are
connected to the top cover plates so you wont have to bother about it.
However both rollers can't be removed yet because of the focal plane
shutter roller position plates and the roll film covers. The plates are
fitted by three bigger metal screws on the top inside and three on the
bottom inside. Further more three little black screws on the top and
bottom holding the black roll film cover. Also two roll film conductors
on each side will come off while dismounting the plates. Once this is
done, you can remove the focal plane rollers by sliding them out
through the top holes. Check the fabric for holes or other anomalies.
Check if the fabric ends are still firmly connected to the rollers and
if necessary re-glue them. Clean the shutter rollers shaft ends and
check the working of the spring inside the roller. Before remounting
check if washers are needed to get the roller pinion at the right
height for an optimal connection with the winding tooth wheel. After
remounting the winding control, check the position of the curtain wide-open -slit if it corresponds with the
setting figure O in the winding window. If
not make sure it does. Before mounting the left plate turn the tension
key a few turns to bring some more tension on the spool and remount the
control panel with figure 1 in the window while keeping the roller
under tension. This is not easy, but with a lot of patience you'll find
a way.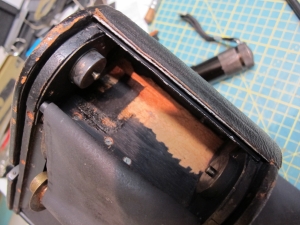
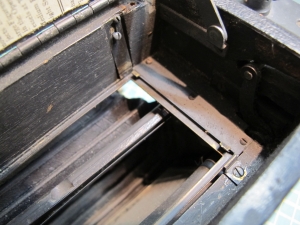
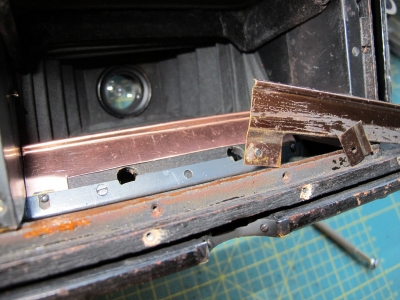
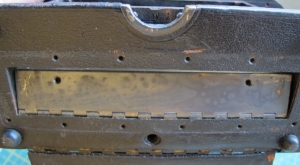
Taking-up spool compartment, view on the focal plane shutter compartment,
open camera with removed back cover and mirror house.
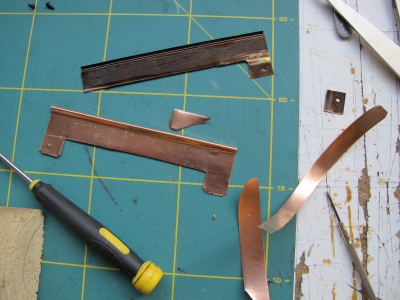
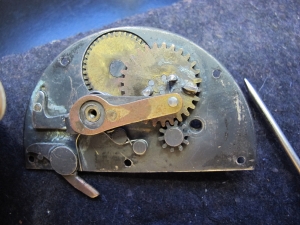
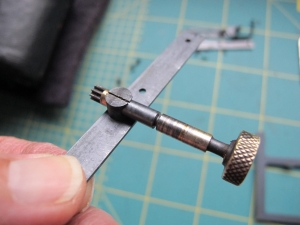
The above photographs show the making and replacing of the mirror
catch. The original one (visible on top of the picture on the left) was broken and
not suitable any more.
I cut a new replacement out of an identical thin brass plate and by bending and
tapping the metal took its correct shape. Not surprised that it worked out so
well...
Final touch was the black lining of the brass.
This construction, where the spring loaded mirror is hold down by the release
button assembly against the tensile force of two mirror springs placed left and right
above the mirror,
makes it possible to wind the film without the need of a dark slide.
Incoming light through the open lens is entirely kept out the exposure chamber
by the light baffle in combination with the (in reflex modus) mirror frame.
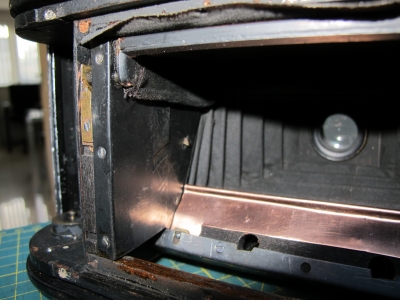
The next photo shows the open back where the mirror frame meets the upstanding
light baffle.
In this situation the film can be wind to the next position without the need of
a third curtain like the Graflex
Compact Camera.

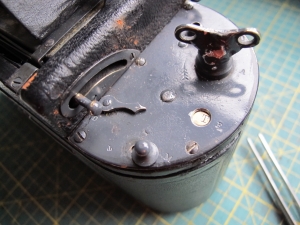
To catch, set and keep the mirror in its 45 degree
position waiting for the release, the brass light baffle stands under strong
pressure of the bottom spring.
The bottom spring is a long half elliptical shaped spring which is hidden inside the bottom and
is hold by the brass plate.
This construction is essential for the working of the
reflex modus of this camera.
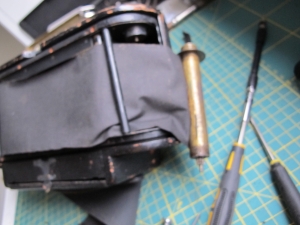
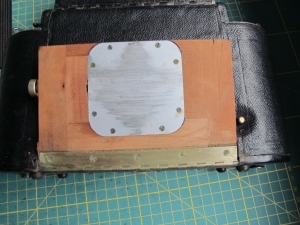
Hinged Bottom Spring Compartment
The very rough or better to say non-running focusing knob which
is situated in the front door, forced me to remove the front
leatherette to see what was wrong.
After removing I found a 10x 8 cm
piece of newspaper glued to the back of the leatherette.
The top line
reads "...RAT AND CHRONICLE Tuesday August...".
Some research learned
me that it original reads, the Rochester Democrat and Chronicle news
paper which makes it almost sure that this camera was made in
Rochester.
As the Autographic feature was launched in 1915 and the
viewing hood scissor construction was replaced in 1918 by a simpler
folding hood,
this particular camera product must be dated in one of
these 3 years.
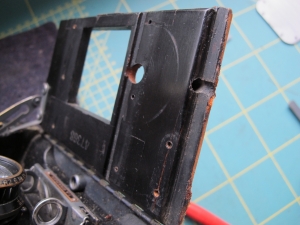
Below you see the removing of the front leatherette and
dismounting of the focussing knob.
The focusing shaft is held by a steel clamping sleeve which can be
forced with a screwdriver to get the opening a bit wider.
This ended up
with a nice freely adjustable focusing knob.
A piece of almost the same
leather as the previous one, clued to the hinged cover of the drop bed finished the job.
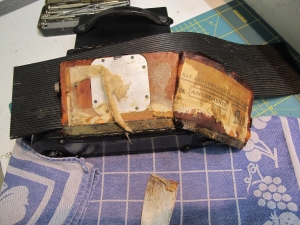
Arrival condition drop bed, tearing off old front leatherette to get access to
hidden focus knob mechanism.
Focus knob cleaning, replacing mechanism and finally gluing the new front drop
bed leatherette.
The total repair cost me two weeks and resulted in a good working
camera. As mentioned before, I found out that the ƒ 6,3 lens was
definitely not the right one for this camera.
Infinity focussing could
only be obtained by completely drawn out lens board.
Focussing on a
nearer object closer than 15 yards was impossible. However, in the mean
time I was lucky to find the original B&L Zeiss Tessar 113 mm.
Series 1c E.F. ƒ4,5, # 14.

Tessar Ic 113 mm E.F.
f=4,5 Nr. BS2265 Bausch & Lomb
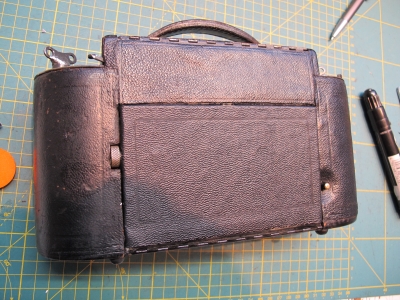
Graflex 1 A back side equiped with Autographic feature.
Note: the aperture back is closed with a removable cover that has an
autographic feature which when opened by a sliding mechanism, enables
to write
location or names onto the film-back paper. Using a metal stylus
the text was written on a kind of typewriter carbon paper.
After developing the film, the written text became visible on the
negative after developing.
George Eastman purchased this invention from Henry J. Gaisman and paid
300.000 US$ for it. Kodak used this new invention in all its so called
Autographic cameras.
Being part of the Eastman company, Folmer & Swing's 1 A Graflex
camera was equipped with the Autographic feature as well.
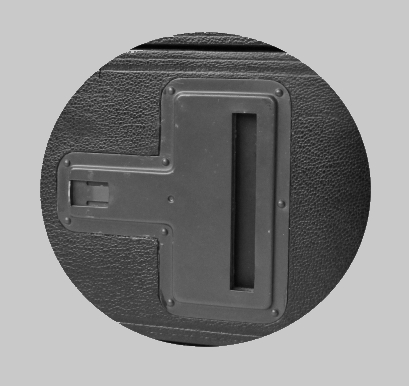
The autographic feature

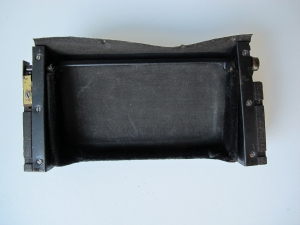
The Graflex 1 A from the back

Backside with removed roll film cover
photos Jo Lommen
The Graflex 1 A Operating directions
There are still more interesting Graflex Cameras to explore